Posted on Leave a comment

Setting Up An LEI Kite

Setting Up An LEI Kite

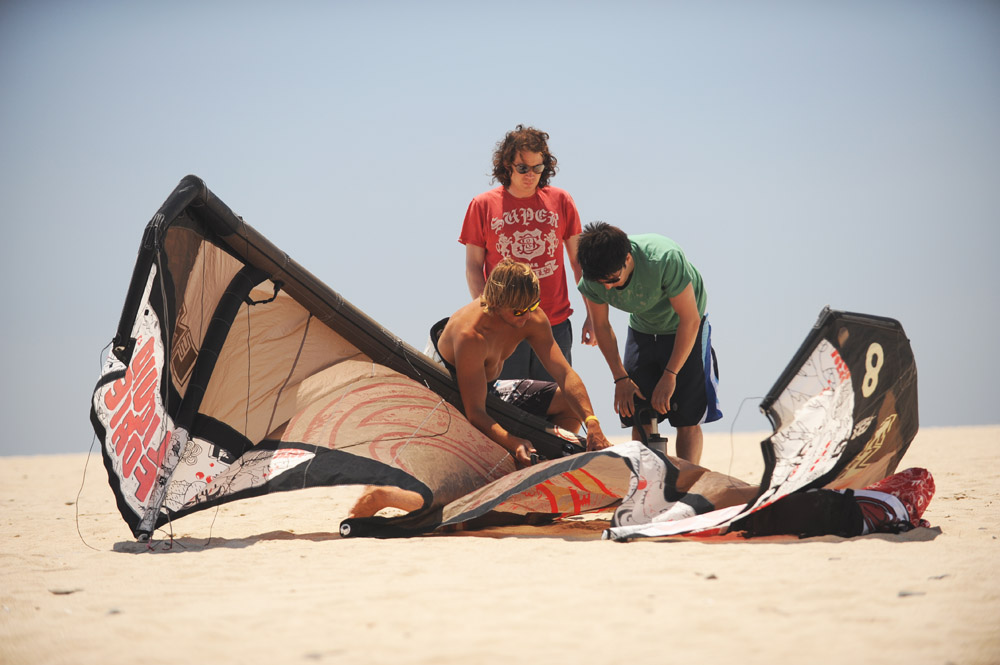
Now that some of you will be moving onto Leading Edge inflatable (LEI) kites, we’d better take some time to explain how to set these baby’s up, as it’s very different to the kites we’ve been using so far.

By now you should be happy with the concept of upwind and downwind. An object upwind is nearer to the source of the wind than an object downwind. Thus if person A is upwind of person B and person has not washed in a long time, then person B will be able to smell person A as the wind is blowing off the upwind person A onto the downwind person B.

We will be setting up our kites with the kite upwind and the lines running downwind to the bar. The reason for this will become clear when we have set the kite up.

First take out the kite. The first thing to look for is to examine the first strut you can find. The strut is one of the the inflatable condoms running the width (not length) of the kite. Have a look at how you put air into the strut. If there is a tube leading from the leading edge to the strut and no way to inflate the strut directly you have what is called a one pump system on your kite. Otherwise you’ll find a valve on the strut itself allowing you to inflate the strut directly.

Setting Up An LEI Kite

One Pump

The main advantage of a one pump system is that it’s much quicker to inflate…I love them because I’m lazy. On the down side they do weight a bit more and can be a nightmare if you get a puncture.

If you have a one pump system you can simply take the kite out of the bag and roll it out with the leading edge (the large condom running the length of the kite) facing into the direction of the wind, with the struts on top facing skyward. Check all the tubes connecting the leading edge to the struts, they may well have some sort of gate system on them, if they do set these to open, if they don’t go and find out why they don’t have them from who ever you bought the kite from!

From here attach the pump leash to the leash attachment point normally found in the centre of the leading edge. Now as long as you have hold of the pump you have hold of the kite so by simply placing your feet on the cunningly crafted foot panels on the pump you can keep the kite in place with no hands!

Have a look at the valves on the leading edge of the kite. Normally you will one large valve with no type of stopper system, this is the dump valve used to get the air out quickly at the end of a session (so you can get to the pub quicker). The other valve should be smaller and may or may not have a stopper system.

You need to close the dump valve before you start to inflate the kite. Make sure the valve itself is clean and sand free (as sand will destroy valves as well!) and then fully close the valve. You do not need to push the valve into the kite (like on a lilo) but the valve should stay sticking all the way out, pushing the valve in causes damage to the bladder.

Get Pumpin’

Now simply fasten the pump nozzle into the inflate valve and start pumping. You will find that as the kite starts to form into its characteristic bowed shape the wind gets under the kite and the kite actually starts flying harmlessly in the smiley position, (you did attach the pump leash didn’t you?).

If its the first time you’ve inflated it some of the struts may not inflate properly because of kinks in the tubes running from the leading edge to the strut, straighten out the kinks and you should be gold (also check the gates are set to open before you start smashing things up).

No One Pump?

If you don’t have a one pump system, then roll the kite out like a towel, with the wind flowing over the length of the kite. You can then take a bit of sand and use it to secure the upwind wing tip of the kite only. Do not put sand all over the kite as not only is it unnecessary but can actually cause problems as the wind can now get under the kite and actually form the material into a sail shape causing the kite to take off. By securing it only at the upwind point you are ensuring the kite is simply a flag, and while it can still take off if you don’t secure it properly, once fully secured it will sit quite happily.

From there pump the struts up one by one, in no particular order and then inflate the leading edge. Half way through inflating the leading edge you’ll need to spin the kite around into the “smiley” position to prevent it from making you look like an idiot as it attempts to take off sideways.


Securing The Kite On The Beach

You want the kite to be as hard as you can effectively manage. Be more concerned about under inflating the kite than over inflating it, most bladders are built very well these days and it’s likely you’ll break the pump before you burst the bladder! The only exception to this is if you’re going to leave it sitting on a very hot beach for a long time (which I really wouldn’t recommend you do anyway) as the air will expand and could cause your kite to explode.

Some kites come with a recommended psi (for most it’s just damn hard!) and many pumps these days have a air pressure gauge so you do this with a high (ish) level of precision. If not drum skin tension is what your aiming for (probably harder than you think!).

Simply remove the pump leash from the kite (keeping hold of the kite whilst you do) and now holding the kite by the leading edge in the centre flip the kite over and lay it on the beach leading edge down with the wind flowing over the centre strut (or panel) of the kite so forcing the kite down onto the ground.

Take some sand and place it on the centre panel(s) of the kite. The windier it is the more sand you’ll need but as my CO used to say…’there’s no such thing as overkill’ put a tonne on and it’ll save you from potential embarrassment later as you’re picking your tattered kite out of that barbed wire fence or tree that looks so far away right now!
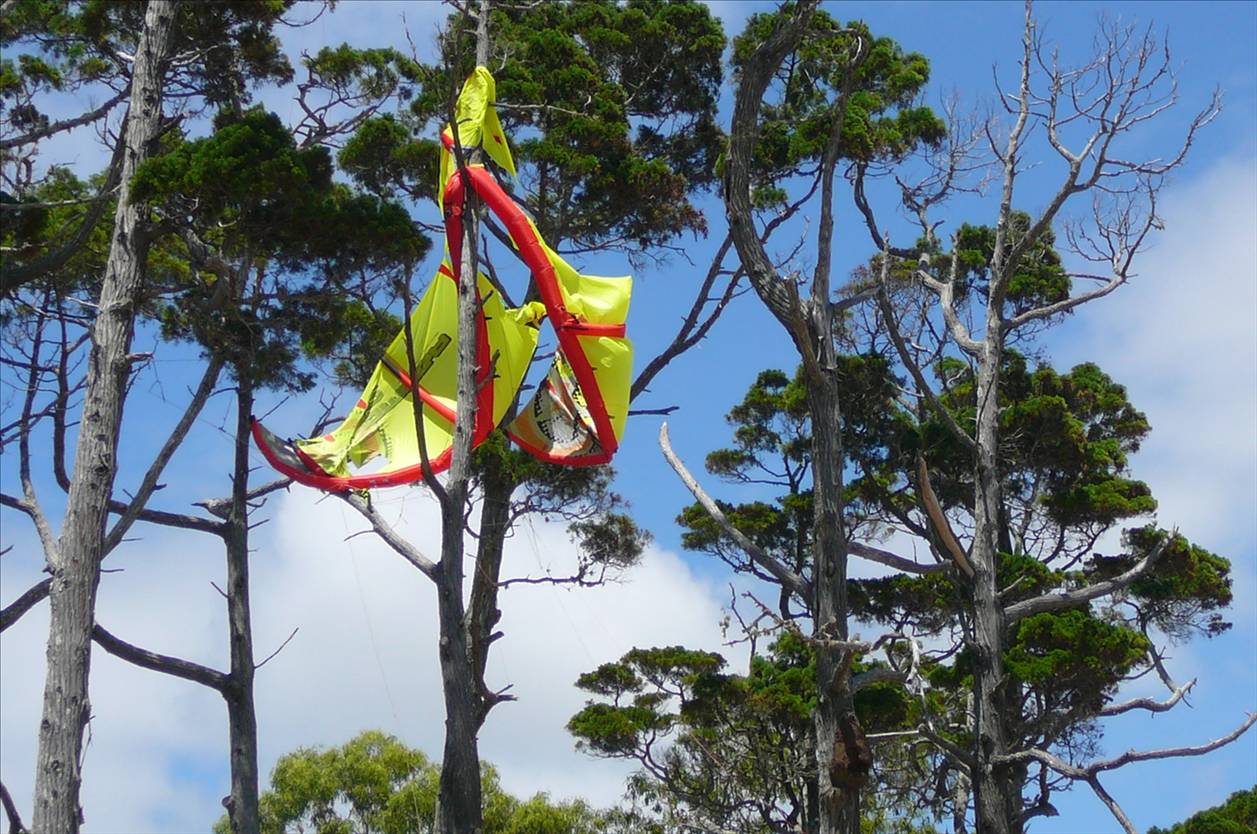
Kite in Tree

The Bridle

Now that the kite is sorted come round the back of the kite and take a look at the bridle. The bridle consists of the lines that run off the kite in triangle formations, where the lines from the bar will attach.

These should be free of knots and any pulleys should be clear of sand and free to run up and down the line. While you are there check the lines these pulleys run over that they are not worn, as soon as these start to show signs of wear and tear they should be replaced as they are one of the major fail points of any modern kite.

Once your happy with the bridle you’re ready to…

Sort the Bar Out

Now roll the bar and lines out downwind. We do this downwind so that once everything is set up we can easily look up our lines and check everything is attached to the right bit with no tangles and in case we haven’t put enough sand on our kite we will get another chance to rescue it from the barbed wire fence as we are in the way!

Once your lines are laid out seperate them and simply match the lines up with the corresponding pigtails on the kite. Note most bars are colour coded to ensure you get things the right way round. These are often coded using the nautical system of Port or left being red…”There’s no RED port LEFT in the bottle.”

Now because at this point we are effectively setting up our kite backwards (the kite will always fly downwind of you) the rule reverses, so when setting up the kite this way we ensure that the red side of the bar is on the right hand side.

Often the pigtails on the kite will be colour coded to match the bar so ensure you are attaching red pigtail to red pigtail and all should be cool!
Posted on Leave a comment

Wind vs Current & Rip Tides

The Tide

Often when you are riding you will notice that whilst riding in one direction you are fully powered up…maybe even a little overpowered, whilst in the other direction you have the work the kite like crazy and can barely stay upwind.

This seemingly strange effect is caused by the direction of the tidal current.

Imagine that you go for a jog and the wind is blowing at your back. The wind is blowing at 15 kph (I know we should be using knots but who talks about running speeds in knots…even I’m not that geeky) and you are running at 10 kph. The actual wind you will feel on your back is only 5 kph.

Again this isn’t precisely correct as it fails to take into account induced wind and any physicist out there could rain on my parade but for the purposes of this example it will suffice.

Later on in the jog on the way home, you are running into the wind (isn’t that always the way it happens, when your tired and dreaming of a shower) the wind is still blowing at 15 kph and you are still running at 10 kph. Now the wind you feel on your face is more like 25 kph as you are running at 10kph into a wind of 15 kph.

The Same Thing Happens On The Water

The Tide

The exact same thing happens on the water as you ride with or against the tidal current. So lets say the wind is blowing from the West at 25 kts and the tidal current is flowing in the same direction at 10 kts and you launch from the beach and head out.

Now as the tidal current is pulling you, and thus your kite, in the same direction as the wind at roughly 10 kts the actual wind your kite will feel is only 15 kts.

Now reverse the tidal current so the tidal current is flowing in the opposite direction to the wind again at 10 kts. Now when you start to ride the tidal current is pushing you (and your kite) towards the wind at roughly 10 kts which means the wind that you feel in your kite is roughly 35 kts.

This is why some locations only work in certain winds with certain tides, as the tidal range has to be running in the right direction for the effective wind speed to be right. If you combine this with the rule of twelfths you can see that if you are looking for a wind vs tide situation then the best time to go riding would be between the 3rd and 4th hour as at this point the influence of the tidal stream will be greatest.

These examples are hugely simplified and don’t worry this isn’t something you need to sit at home at night planning and plotting on tide charts. It does help you however to be aware of these things early in your career as that way you can ride with a greater knowledge of what effects the local conditions are having on your session and so hopefully use the conditions to aid you rather than trust to chance.

Rip Tides

Feared and loved by surfers throughout the world, rip tides can be lethal if you don’t understand them…or highly useful if you do. Rip tides (or currents to be more precise) can form on any beach but are more prevalent on cove shaped beaches. A rip forms because as the tide pushes up the beach there simply isn’t enough space to hold it all and some of it thus needs a to find a way to get out of the way of the incoming tide and back out to sea, so making space for the water that is following it. This is why these will often be found in cove shaped beaches where space in the bay is limited. That said there will pretty much always be a rip current of some sort at some point along any beach whilst the tide is coming in.

A rip current is both deadly and useful. Deadly because quite obviously if you get caught in one it will pull you out to sea. Many rip currents are impossible to swim against and will pull you out very fast. For that same reason if you understand how they work they can be very useful (especially for surfers) for getting away from a beach and out of the impact zone of crashing waves. Many surfers will ride a rip current like this to get out back with a minimum of effort.

The way to get out of a rip current is not to swim against it as is most peoples instinct but to swim perpendicular to it. A rip current is often a very localised effect and may be a channel only a few meters across thus by swimming at 90 degrees to it you’ll often find yourself released back into calmer waters within a few strokes. That said some rips can be a little wider, but in general this is an effective technique for escape.

Posted on Leave a comment

Tidal Range & The Rule Of Twelfths

Tidal Range and the rule of 12ths

Tidal Range and the rule of 12ths

Something you will definitely become an expert on if you live in a place affected by tides is how the sun and moon affect the tide and how the tide actually works. This is absolutely vital to understand if you are to keep yourself safe but also get the most out of your sessions. Timing a session right as regards the movement of the tide can be the difference between an epic session and a session spent sunbathing.

What is Tidal Range?

Tidal range is defined as the difference (in meters) between the low tide mark and the high tide mark. Thus if you have a low, low tide and a high, high tide, the tidal range will be great, conversely, if you have a high, low tide and a corresponding low, high tide, the tidal range will be small.

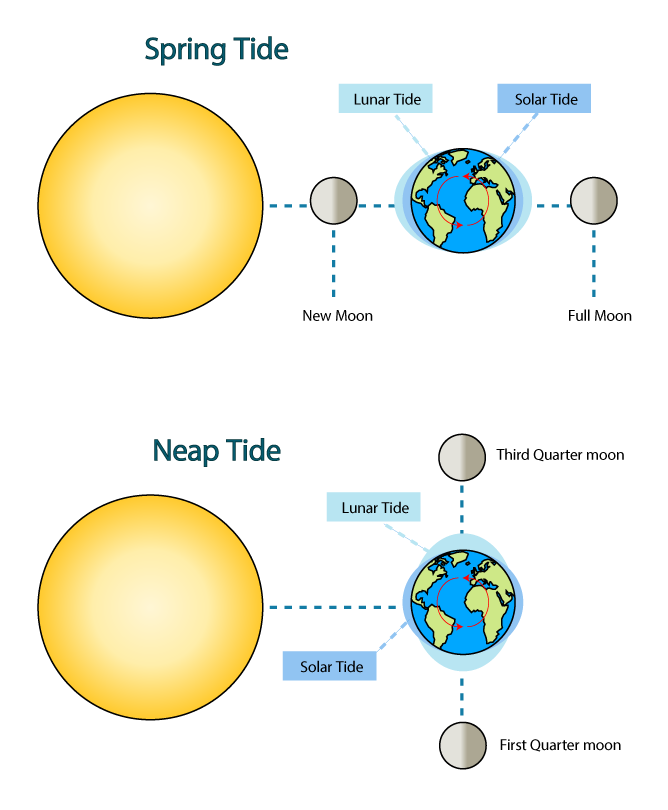
Tidal range is controlled by the alignment of the sun and the moon. When the sun and moon come into alignment as happens twice a month then all the gravitation pull aligns in the same direction. This has the effect of sucking all the water on earth into the middle of the globe. As water cannot sit only on one side of the earth it is balanced on the other side of the world.

High, High Tides

As the earth rotates this bulge of water moves around the earth creating high, high tides as land masses encounter the ‘bulge’ and low – low tides when the bulge moves on. This alignment happens when ever there is a full or a new moon as at these times the sun and moon are aligned. It doesn’t matter if the sun and moon are on the same side of the earth or on opposite sides because the water has to be balanced on both sides of the earth the gravitation fields still align.

Low, Low Tides

Conversely when the sun and moon are out of alignment the tides will be significantly less as the water of the earths oceans will be distributed around the earth in a more even manner. This is seen most when the sun and moon are completely out of alignment or at right angles to each other, ie when we have a half moon, at this point the gravitation fields are pulling at right angles to each other so the earths water is distributed more evenly over the surface and we get correspondingly little tidal range, with high, low tides and low, high tides.

moon-tides

Spring & Neap Tides

These 2 events are referred to as Spring and Neap tides. Spring tides occurring at Full and New moons and causing high tidal ranges, and Neap tides occurring at Half moons and causing small tidal ranges. Because of the momentum like effect of gravity there is a slight delay of around 2 – 3 days between the moon state and the corresponding effect. Ie you will get a Spring tide roughly 2 -3 days after a Full or New moon.

Using this information you can accurately predict how high a tide is going to be on a particular day. In places with little tidal effect this may not be so important in other places (estuaries for example) this may be of huge importance and mean a difference of miles between high or low tide water marks.

The Rule Of 12ths

The rule of 12ths tells us (roughly) the amount of water that will be moving, either in our out, at any stage in the tidal cycle of a semi diurnal (twice daily) tide.

Starting at Low tide and moving towards High tide:

In the 1st hour after a low tide we experience what is called slack water. This is Where the tide isn’t really moving and thus not much water is flowing. A small amount of water will however be pushing up the beach. In this hour 1/12th of the total volume of water that is going to move as the tide comes in will move.

In the 2nd hour the flow of water will increase and speed up, during this hour 2/12ths of the total volume of water that will move with the incoming tide will move.

In the 3rd and 4th hours the tide really picks up speed and a huge volume of water will move. During each of these hours 3/12th of the total volume will move. So thats half the total volume of water in these 2 hours.

In the 5th hour the flow of water will start to slow again as the tide gets nearer to its highest mark, In this hour 2/ths of the total volume of water will flow.

In the 6th and final hour of the tide, the tide has more or less reached high tide and has entered the phase known as slack water again. In this hour only 1/12 th of the total volume will flow.

From here on the tide follows the same pattern but this time the water is flowing out.

The Time To Care

This information can again be critical in certain locations. The 3rd and 4th hour should be treated with a little respect anywhere where there is significant tide as a huge amount of water is flowing and it is flowing fast. This can have a huge effect on your safety, your ability to practice and the distance you have to walk to get back to the car.

It is beyond the scope of what I’m covering today to go into specifics of conditions that can be found at every single spot. That said you need to know if there are any particular hazards you should be looking out for, check with someone who knows about these things, kitesurfers, windsurfers, surfers, fishermen will all have a good idea of what you need to look out for.

Remember the sea is a big old girl and needs to be treated with respect.

Posted on

Body Dragging In Kitesurfing

Learning To Body Drag

Getting Your Pinkies Wet

So we move onto our first lesson in the water. Before you take another step make sure you’ve read and fully understood the previous lessons. Humans are not designed for the water so make sure you understand what your about to get yourself into before attempting it.

The aim of body dragging is to use the kite to pull us torpedo like (or at least flapping, half drowning fish like) through the water. Once you actually “get it” it’s really easy and very enjoyable but it does take a little faith to master it.

Before You Go

Before you actually launch your kite and head to the water identify your downwind marker. This is a point visible from sea level that will serve to remind you to get out the water at this point. This should preferably be about 200m downwind and well upwind of any obstacles/hazards but will obviously depend on the beach you’re working from. My preference is for many short runs rather than fewer longer ones as they mix things up and give you a chance for a bit of a break.

Now you need to identify a point of no return. That is another marker around 100m downwind of the downwind marker that marks a point by which if you have not managed to make it out of the water by here you should simply pop your safety and self rescue in. Again the exact positioning of this point will depend on your beach but should be at least 200m upwind of any hazards.

Even if there are no hazards it is a good idea to have a point of no return marker just to ensure you don’t end up 3 miles downwind, it does happen, body dragging can be exhilarating when you get it!

Body Dragging

Having fully checked the wind direction, wave height, forecast and done a risk assessment (you have read those lessons haven’t you?) launch your kite and make your way to the water. Walk yourself out until you’re about waist depth. Now keel down (gently) in the water, this should bring you to about chest/neck deep. Doing this too violently in light winds will have the effect of pulling the kite down towards you, which can de stabailise it in the sky and leave you without control for a few critical seconds as the kite resets.

By kneeling down you’ve done 2 things. Firstly you’ve made your ‘take off’ easier by meaning that when you move forward into the body drag position you have less distance to move and so will de stabilise the kite less. Secondly you have reduced the distance you need to travel out away from the beach.

Proximity to the beach is our friend at the moment and all these next exercises are made a lot easier if you can simply stand up if something goes wrong and start again.

Learning To Body Drag

So you’re kneeling down in the water (hopefully not too far away from the beach). Now fly the kite to 12 o clock and hold it still. Next you need to gently lean forward into the superman position letting all contact with the ground go and floating in the superman position underneath the kite.

This part takes a little faith. Mainly because, especially on light wind days, it can be difficult to believe that the kite will hold you up out of the water…believe me it will.

Common Errors

There are several common mistakes that people make at this point:

Swinging Your Legs Around In Front Of You Into The Sitting Position

This one is fairly common especially on a first run, people often simply do not feel natural going into the superman position, usually caused by the (healthy) fear of your head disappearing under the water as you lean forward.

Have faith. Even underpowered on light wind days, the kite will hold you and your head out of the water. The reason we go to the superman position is because from here your legs act as a keel, keeping you straight in the water and providing you a level of stability.

As soon as you bring your legs under you into a sitting position this keel disappears and you tend to spin under the kite, often ending up upside down underneath the kite with no idea of which way is left or right…this inevitably leads you to pulling the bar the wrong way…hard.

If you do find yourself in this position just let go of the bar and start again. If the kite crashes its good relaunching practice. Either way releasing the bar gives you the time to sort yourself out again and avoid embarrassing and potentially painful encounters with the beach

Jumping Forward into the Water

Once you start to lean forward you are actually pulling the kite down with you as you fall.. On light wind days, this can have quite an effect on the kite especially if you really jump into the body drag. It is to minimise this movement that we kneel down before starting to body drag. By lessening the distance we need to ‘fall’ forward we lessen the disruptive movement on the the kite as the lines go tense and then slacken again as you bob back up to the surface.

Not Having The Kite Still At Take Off & Under Steering The Kite

Now you are in the water the physics of flying the kite change slightly. On the beach when you fly the kite, by simply leaning back you are able to provide resistance against the pull of the kite and so prevent yourself from chasing the kite downwind every time the kite gains the slightest power.

In the water this no longer applies. Every bit of power you put into the kite results in you being dragged in that direction through the water.

Once inertia is overcome you will move towards the kite. Because you are a heavier object than the kite once you start to move your momentum is greater and so you will carry on moving towards the kite until friction slows you down again. This means that every time you move the kite you actually move a little bit towards it. This results in a bit of slack going into the lines which makes the kite more sluggish to respond to your steering. Simply put you need to steer harder whilst body dragging in the water to get the same result you would expect on the land.

This is often noticeable if, when you start to body drag, the kite is already moving. As you are now moving towards the kite from the word go, there is already slack in the lines and trying to steer the other way takes a lot more steering than you are used to, having grown accustomed to flying the kite on the beach. I would recommend you to take off and keep the kite still at 12 o clock for a count of 3. Then once your happy and the kite has stabilised from the take off with tension in the lines, start to move the kite gently back and forth.

Into The Deep Blue

Once you happily dragging along behind the kite simply start moving the kite gently left and right. Noticing how you can steer yourself by doing so. Your goal here is to simply keep the kite in the sky. A good tip here is not to bring the kite too close to the edges of the window (close to the sea) as (especially on light wind days) you will find it difficult to bring the kite back up again.

Beware at this point, you will be moving fast even though it’ll probably feel as though you aren’t moving at all. Make sure before you start to body drag that you remember to look for your down wind marker…remember when choosing it, it has to something that will be visible from sea level. make sure you stick to it, you’ll most likely get there a lot faster than you think.

To get yourself back to the beach simply point the kite in that direction and hold it there until you are back on dry land. If conditions are right hopefully you’ve managed this entire exercise without ever moving out of standing depth. I realise this is an ideal, but it makes things much safer and gives you a bit more confidence if you can stay close to the shore.

Once back on dry land keep the kite flying at 45 degrees, de-powering the kite if you need to and walk back up to your start point using both hands to control the kite. Giving yourself a big pat on the back.

Changing Direction Whilst Body Dragging

This time we are going to concentrate more on using the kite to steer you. So head out exactly as before. Once you’re actually moving, use to kite to steer you in zig zags, left and right to your exit point.

At this point we want long steady pulls in either direction (while not getting too far away from the beach). So bring the kite down to one side and try to hold it in position at 45 degrees so you are heading away from the beach. Hold the kite still and after a decent amount of time (I would suggest a minimum of 10 seconds) slowly bring the kite through the 12 o’clock position and bring it down to 45 degrees on the other side. You should now be dragging back towards the beach. Again try to hold the kite still until you get far enough back in and then repeat the process heading out again.

You should now be confident to steer yourself both in and out from the beach, if not repeat the exercise until you are. Being able to control your direction is absolutely essential to keep yourself and others safe. DO NOT move on from this lesson until you can body drag in your chosen direction comfortably for at least 20 meters…preferably a lot more.

Posted on Leave a comment

Reading The Wind & Checking Conditions are Good for Kiting

Wind Direction In Relation To The Shore


Reading The Wind
Check the conditions are good for kitesurfing

In this lesson we fast forward a little bit and have a look at winds that are good for kitesurfing (and those that are not), We do this now as many of you will be flying your trainer kite at the beach and so you can start to notice the effects we’re talking about now when you’re out flying your kite, so when you’re ready to start kitesurfing it’s become a little more automatic.

Before you even put one little toe in the water there are a number of checks and risk assessments you need to do. 90% of the time when something goes seriously wrong in a kitesurfing session it’s not due a mistake made on the water but a bad decision on the beach before you even start to set up your kite. Start noticing these effects now and you’ll save yourself a lot of time when you actually go kitesurfing.

Before You Even Think About Hoisting A Kite…

Ensure You check the forecast and the tide times. The forecast is fairly simple and you should be able to tell yourself by now if it’s any good for you to go kitesurfing, once again if in doubt about the particular kite you are using in any given wind speed, check the manufacturers guidelines.

The tide is a slightly more slippery beast and you’ll need to check with someone who knows what they’re talking about to determine the best phase of the tide to go in. In some places it doesn’t matter in other places it is of vital importance, check with another kitesurfer before you go.

Once at the beach (and ready to fly your kite) you can run through the following checks:

The first rule is one I was first taught as a dinghy sailor:

“If In Doubt, Don’t Go Out”

This is especially true as a beginner. If the waves just look a little bit meaner than you’d like or the wind is a little bit gustier than you’re used to…forget it, go to the pub instead. One of the great frustrations of learning to kitesurf is that as a beginner you do need almost perfect conditions to get out there and practice (so you can build up the confidence to go and take on more challenging conditions). Expect to spend a lot of time waiting around and many wasted trips to the beach in these initial stages. Fear not…it does get better as you do!

Risk Assesment…Sounds Dull Doesn’t It

Every time you arrive at the beach perform a risk assessment. The most important thing to determine is which way the wind is blowing.

Wind Direction In Relation To The Shore

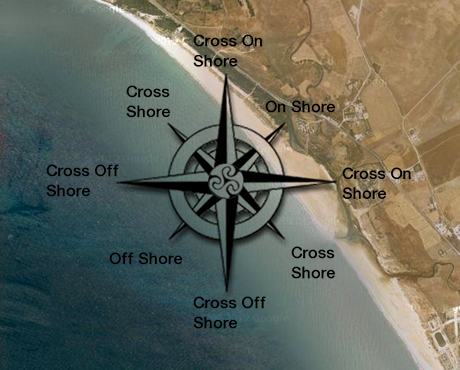
Now we’re on the beach, wind is no longer defined as Southerly or Westerly, but can now be described (more usefully) in relation to the beach or shore. Thus when the wind is blowing off the sea onto the shore it is known as on shore, when the wind is blowing off the shore on to the sea it is known as off shore. When the wind is blowing along the line of the beach or shore line (in either direction) it is known as cross or side shore.

The Wind To Watch Out For…And It’s Not The One You Think

Statistically for a kitesurfer the most dangerous of these winds is an on shore wind. This wind brings waves and in general will feel stronger than in fact it is. This is the wind in which most broken bones, broken kites and broken pride happen as the waves and the wind are both doing their best to keep you on (and pile drive you into) the beach. Thus it is very easy to be catapulted back up the hard beach and do yourself, your kite or others damage. Even advanced riders can struggle to get out in a dead on shore wind. Our advise to start with would be to avoid these conditions and search for somewhere a little more forgiving.

Off shore winds will give a very flat looking ocean and will generally feel less strong than they actually are. The main reason that on shore winds are statistically the most accident prone winds is for the simple reason that no one goes out in an off shore wind. Off shore winds are lethal, make the slightest mistake or suffer a kit failure, which means you can’t get your kite back up in the air and you’ll quickly find yourself a long way out to sea before you know it, with a long swim back against the wind. Do not think that because you’re with someone else or there are other kitesurfers around that it’s alright for you to go out in an off shore. In reality it is very difficult for other kitesurfers to do anything to help you if you have a problem without endangering themselves. At best they can give the rescue services an idea of which way you were heading when you crossed the horizon!

“DO NOT DO IT!”

Cross shore winds can be great, the sea will be fairly flat and it’s fairly safe in that you’ll be returned in the general direction of the shore. If the bay curves round to meet the wind thus ensuring it is absolutely safe, this can be the best wind you can find, smooth and great for wave riding.

As a beginner I would suggest you look for cross onshore winds (that is somewhere in between on and cross so about 45 degrees to the beach) this will offer you ample opportunities to actually get out and practice, is perfectly safe and the waves shouldn’t be too big.

The simple rule to follow when assessing the wind is to draw a line between the source of the wind, yourself and the last bit of land you could cling onto if everything went wrong…then do not go past, or preferably anywhere near to crossing this line. Always assume the worst will happen and remember no matter how good or fit you are, a line can always snap or a kite break.

Next have a look for potential hazards both in the launch/landing area and the sea itself. You’re looking for rocks, pylons and anything else that doesn’t mix well with kites, lines and human bodies propelled at force!

Finally have a look at the sea, you’re best to have a chat with a local at this point as you need to know things like rips, and any other local effects that can impact upon your kitesurfing.

Once you’re happy with all this (yes, it is a lot but as you gain more experience you will assess all of this in a matter of minutes) you’re finally ready to get your little pinkies wet!