Posted on

Body Dragging In Kitesurfing

Learning To Body Drag

Getting Your Pinkies Wet

So we move onto our first lesson in the water. Before you take another step make sure you’ve read and fully understood the previous lessons. Humans are not designed for the water so make sure you understand what your about to get yourself into before attempting it.

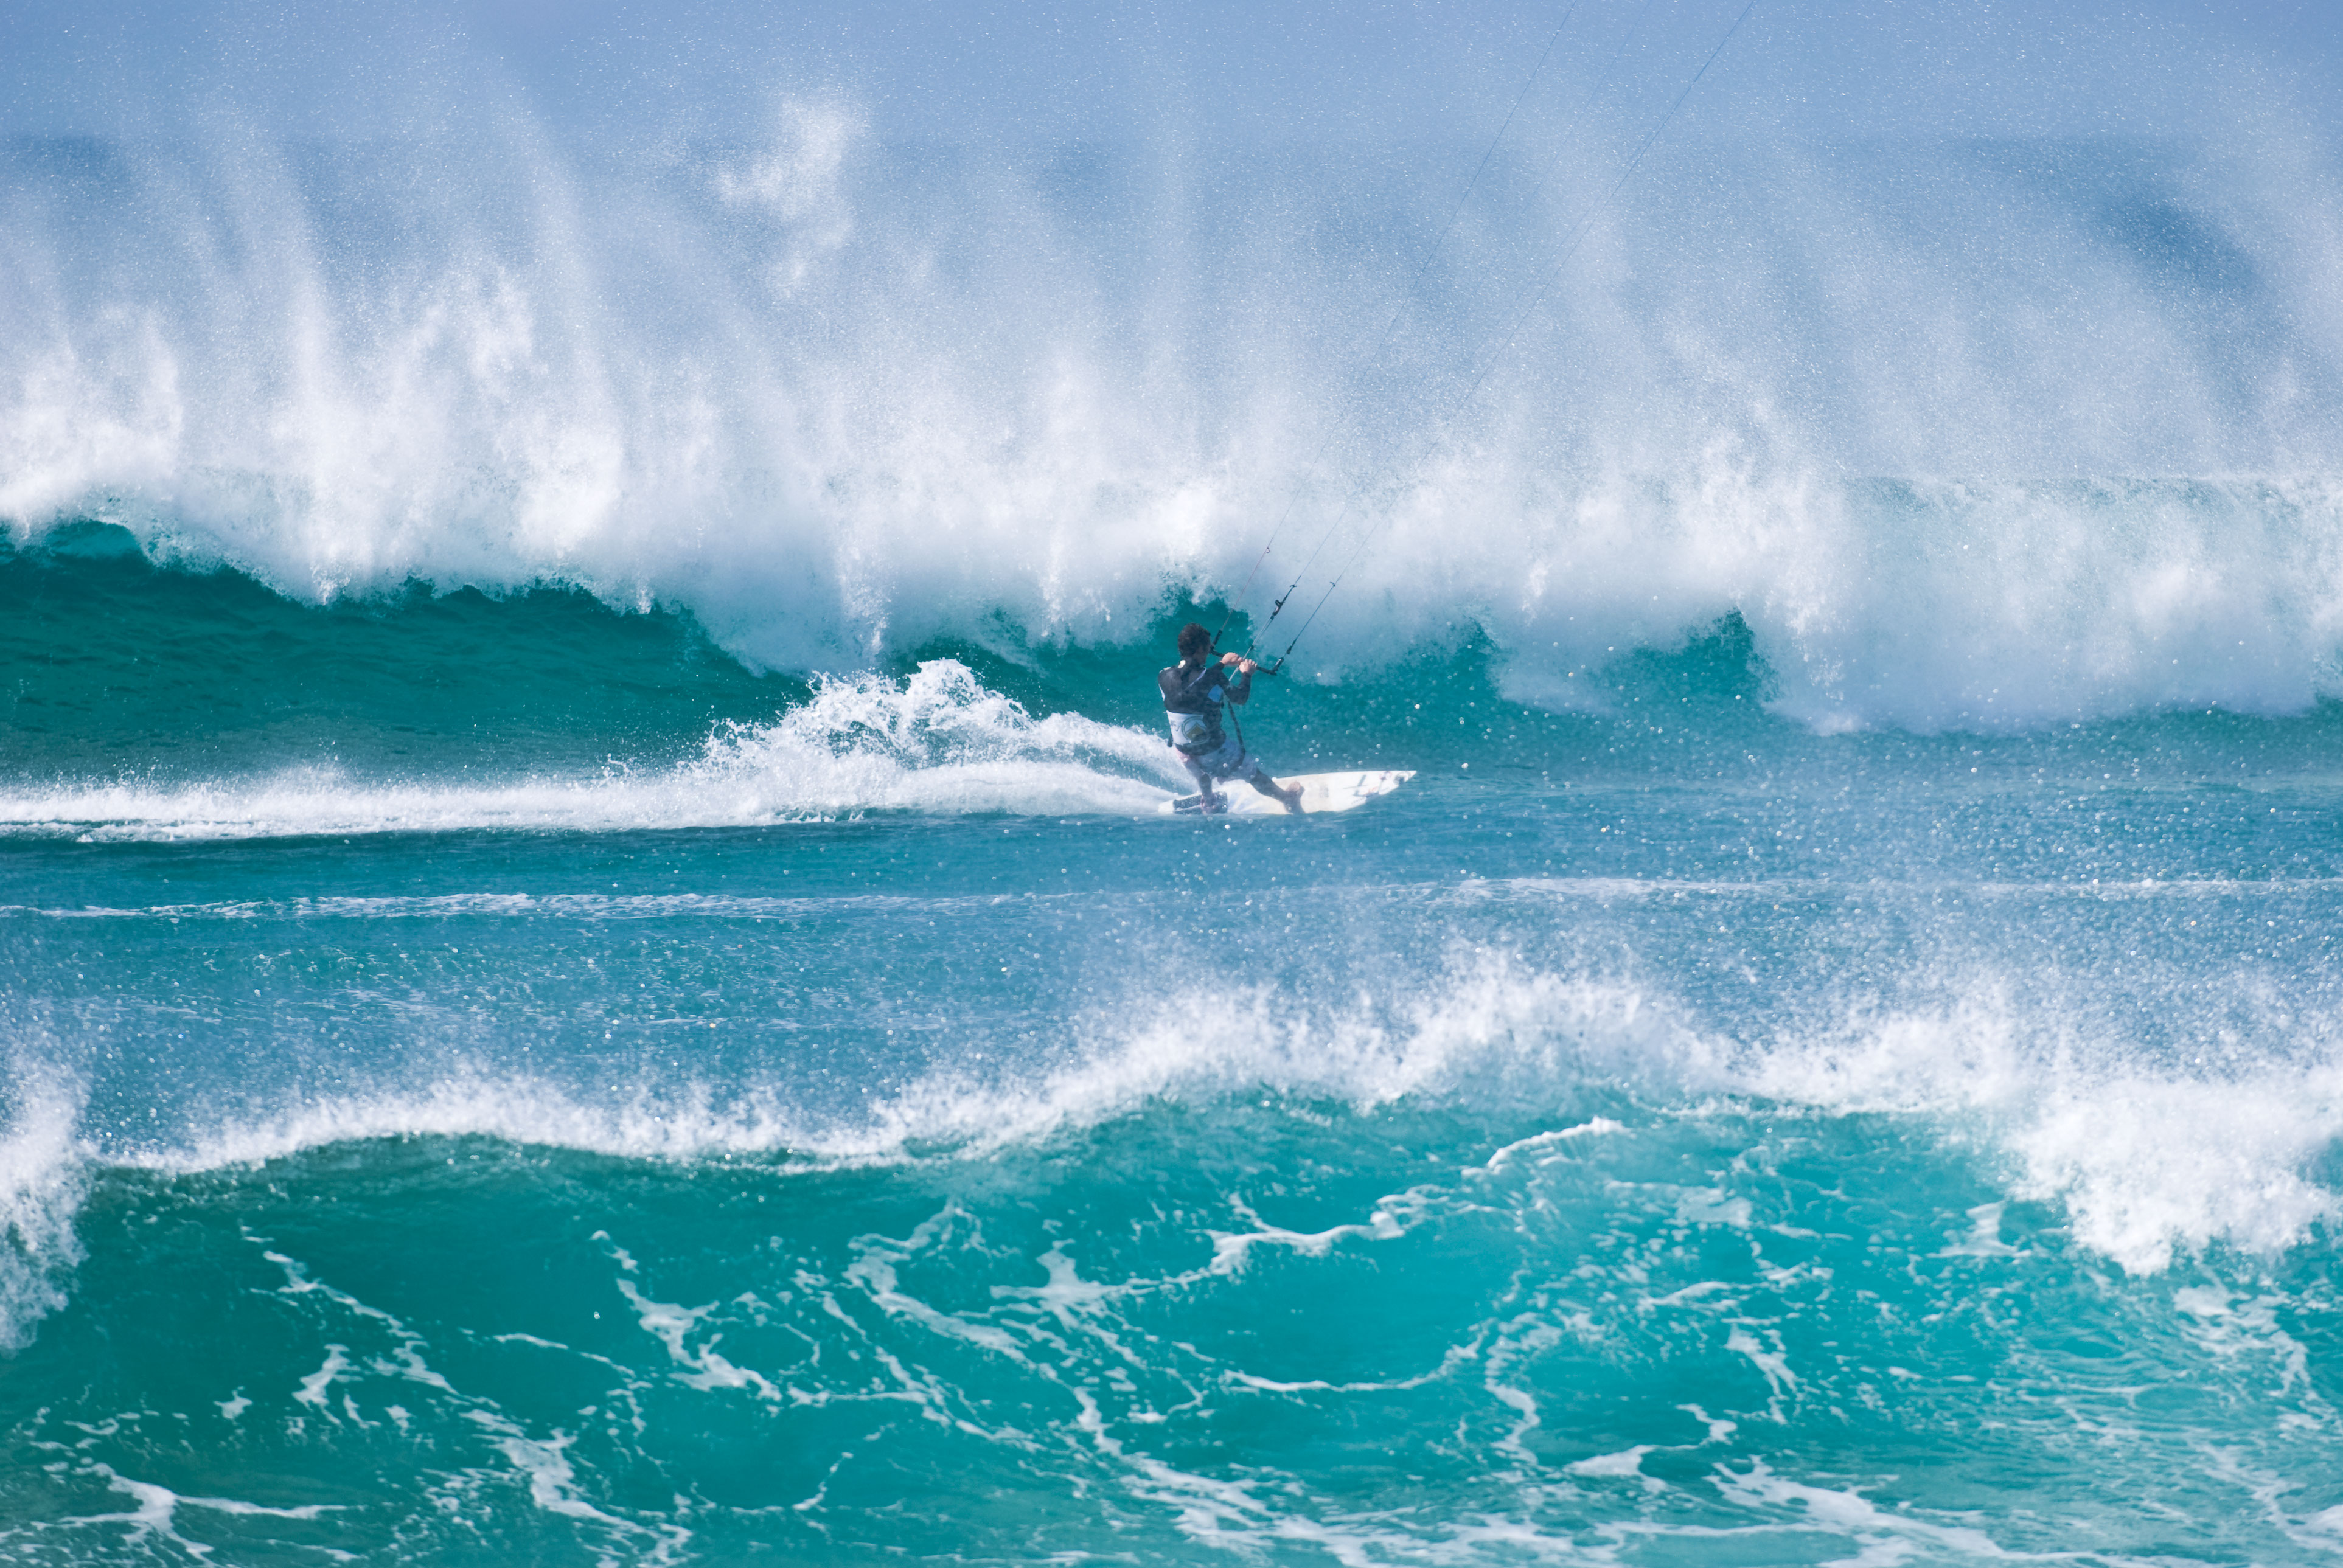
The aim of body dragging is to use the kite to pull us torpedo like (or at least flapping, half drowning fish like) through the water. Once you actually “get it” it’s really easy and very enjoyable but it does take a little faith to master it.

Before You Go

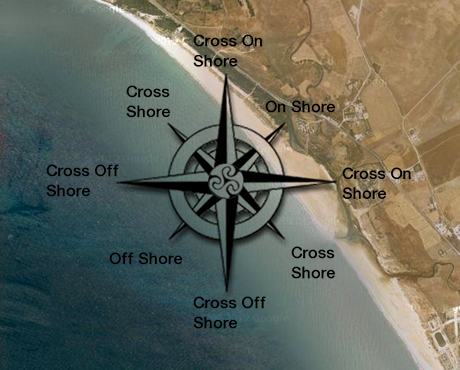
Before you actually launch your kite and head to the water identify your downwind marker. This is a point visible from sea level that will serve to remind you to get out the water at this point. This should preferably be about 200m downwind and well upwind of any obstacles/hazards but will obviously depend on the beach you’re working from. My preference is for many short runs rather than fewer longer ones as they mix things up and give you a chance for a bit of a break.

Now you need to identify a point of no return. That is another marker around 100m downwind of the downwind marker that marks a point by which if you have not managed to make it out of the water by here you should simply pop your safety and self rescue in. Again the exact positioning of this point will depend on your beach but should be at least 200m upwind of any hazards.

Even if there are no hazards it is a good idea to have a point of no return marker just to ensure you don’t end up 3 miles downwind, it does happen, body dragging can be exhilarating when you get it!
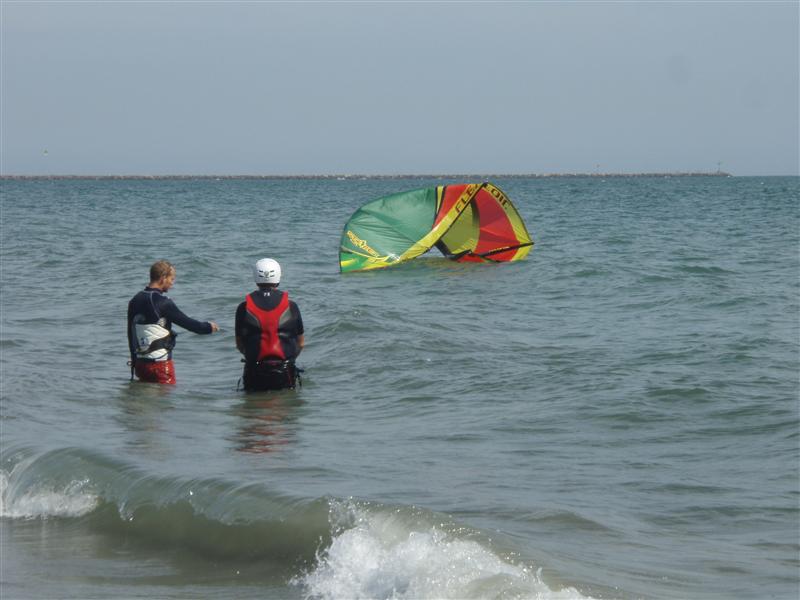
Body Dragging

Having fully checked the wind direction, wave height, forecast and done a risk assessment (you have read those lessons haven’t you?) launch your kite and make your way to the water. Walk yourself out until you’re about waist depth. Now keel down (gently) in the water, this should bring you to about chest/neck deep. Doing this too violently in light winds will have the effect of pulling the kite down towards you, which can de stabailise it in the sky and leave you without control for a few critical seconds as the kite resets.

By kneeling down you’ve done 2 things. Firstly you’ve made your ‘take off’ easier by meaning that when you move forward into the body drag position you have less distance to move and so will de stabilise the kite less. Secondly you have reduced the distance you need to travel out away from the beach.

Proximity to the beach is our friend at the moment and all these next exercises are made a lot easier if you can simply stand up if something goes wrong and start again.

Learning To Body Drag

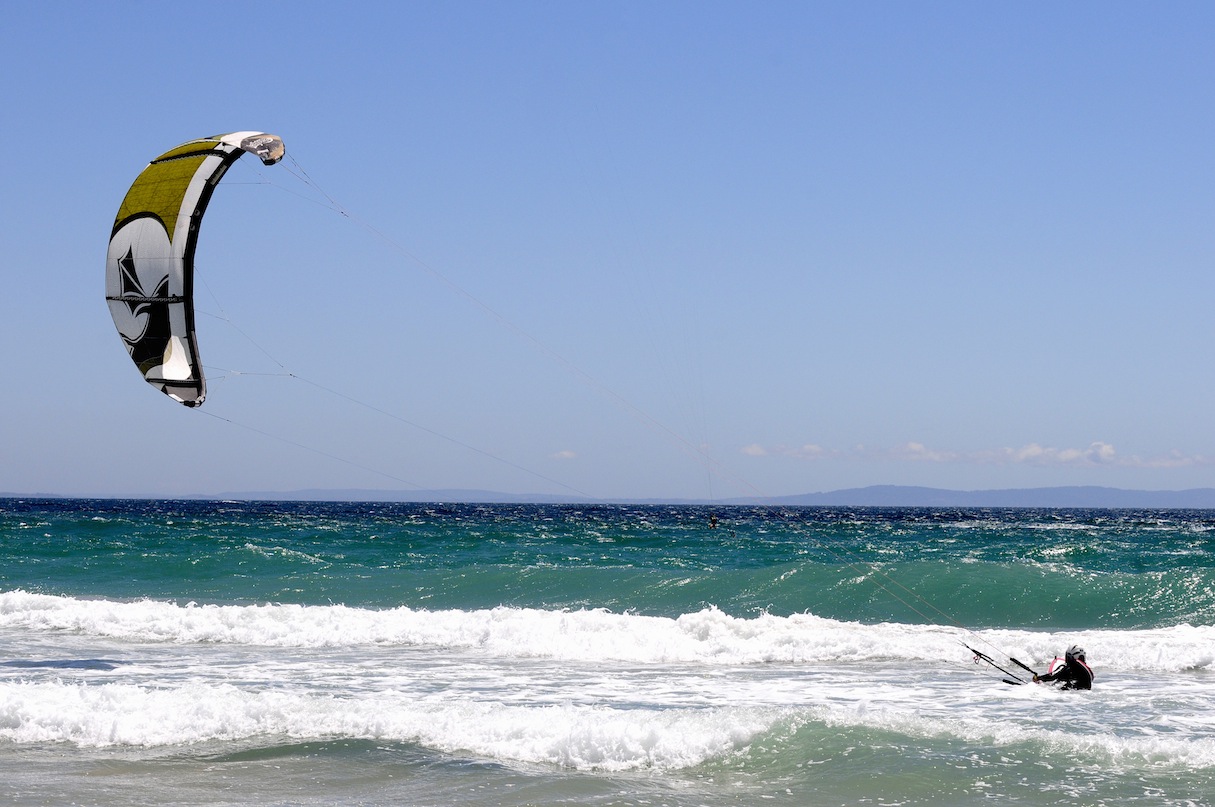
So you’re kneeling down in the water (hopefully not too far away from the beach). Now fly the kite to 12 o clock and hold it still. Next you need to gently lean forward into the superman position letting all contact with the ground go and floating in the superman position underneath the kite.

This part takes a little faith. Mainly because, especially on light wind days, it can be difficult to believe that the kite will hold you up out of the water…believe me it will.

Common Errors

There are several common mistakes that people make at this point:

Swinging Your Legs Around In Front Of You Into The Sitting Position

This one is fairly common especially on a first run, people often simply do not feel natural going into the superman position, usually caused by the (healthy) fear of your head disappearing under the water as you lean forward.

Have faith. Even underpowered on light wind days, the kite will hold you and your head out of the water. The reason we go to the superman position is because from here your legs act as a keel, keeping you straight in the water and providing you a level of stability.

As soon as you bring your legs under you into a sitting position this keel disappears and you tend to spin under the kite, often ending up upside down underneath the kite with no idea of which way is left or right…this inevitably leads you to pulling the bar the wrong way…hard.

If you do find yourself in this position just let go of the bar and start again. If the kite crashes its good relaunching practice. Either way releasing the bar gives you the time to sort yourself out again and avoid embarrassing and potentially painful encounters with the beach

Jumping Forward into the Water

Once you start to lean forward you are actually pulling the kite down with you as you fall.. On light wind days, this can have quite an effect on the kite especially if you really jump into the body drag. It is to minimise this movement that we kneel down before starting to body drag. By lessening the distance we need to ‘fall’ forward we lessen the disruptive movement on the the kite as the lines go tense and then slacken again as you bob back up to the surface.

Not Having The Kite Still At Take Off & Under Steering The Kite

Now you are in the water the physics of flying the kite change slightly. On the beach when you fly the kite, by simply leaning back you are able to provide resistance against the pull of the kite and so prevent yourself from chasing the kite downwind every time the kite gains the slightest power.

In the water this no longer applies. Every bit of power you put into the kite results in you being dragged in that direction through the water.

Once inertia is overcome you will move towards the kite. Because you are a heavier object than the kite once you start to move your momentum is greater and so you will carry on moving towards the kite until friction slows you down again. This means that every time you move the kite you actually move a little bit towards it. This results in a bit of slack going into the lines which makes the kite more sluggish to respond to your steering. Simply put you need to steer harder whilst body dragging in the water to get the same result you would expect on the land.

This is often noticeable if, when you start to body drag, the kite is already moving. As you are now moving towards the kite from the word go, there is already slack in the lines and trying to steer the other way takes a lot more steering than you are used to, having grown accustomed to flying the kite on the beach. I would recommend you to take off and keep the kite still at 12 o clock for a count of 3. Then once your happy and the kite has stabilised from the take off with tension in the lines, start to move the kite gently back and forth.

Into The Deep Blue

Once you happily dragging along behind the kite simply start moving the kite gently left and right. Noticing how you can steer yourself by doing so. Your goal here is to simply keep the kite in the sky. A good tip here is not to bring the kite too close to the edges of the window (close to the sea) as (especially on light wind days) you will find it difficult to bring the kite back up again.

Beware at this point, you will be moving fast even though it’ll probably feel as though you aren’t moving at all. Make sure before you start to body drag that you remember to look for your down wind marker…remember when choosing it, it has to something that will be visible from sea level. make sure you stick to it, you’ll most likely get there a lot faster than you think.

To get yourself back to the beach simply point the kite in that direction and hold it there until you are back on dry land. If conditions are right hopefully you’ve managed this entire exercise without ever moving out of standing depth. I realise this is an ideal, but it makes things much safer and gives you a bit more confidence if you can stay close to the shore.

Once back on dry land keep the kite flying at 45 degrees, de-powering the kite if you need to and walk back up to your start point using both hands to control the kite. Giving yourself a big pat on the back.

Changing Direction Whilst Body Dragging

This time we are going to concentrate more on using the kite to steer you. So head out exactly as before. Once you’re actually moving, use to kite to steer you in zig zags, left and right to your exit point.

At this point we want long steady pulls in either direction (while not getting too far away from the beach). So bring the kite down to one side and try to hold it in position at 45 degrees so you are heading away from the beach. Hold the kite still and after a decent amount of time (I would suggest a minimum of 10 seconds) slowly bring the kite through the 12 o’clock position and bring it down to 45 degrees on the other side. You should now be dragging back towards the beach. Again try to hold the kite still until you get far enough back in and then repeat the process heading out again.

You should now be confident to steer yourself both in and out from the beach, if not repeat the exercise until you are. Being able to control your direction is absolutely essential to keep yourself and others safe. DO NOT move on from this lesson until you can body drag in your chosen direction comfortably for at least 20 meters…preferably a lot more.

Posted on Leave a comment

Reading The Wind & Checking Conditions are Good for Kiting

Wind Direction In Relation To The Shore


Reading The Wind
Check the conditions are good for kitesurfing

In this lesson we fast forward a little bit and have a look at winds that are good for kitesurfing (and those that are not), We do this now as many of you will be flying your trainer kite at the beach and so you can start to notice the effects we’re talking about now when you’re out flying your kite, so when you’re ready to start kitesurfing it’s become a little more automatic.

Before you even put one little toe in the water there are a number of checks and risk assessments you need to do. 90% of the time when something goes seriously wrong in a kitesurfing session it’s not due a mistake made on the water but a bad decision on the beach before you even start to set up your kite. Start noticing these effects now and you’ll save yourself a lot of time when you actually go kitesurfing.

Before You Even Think About Hoisting A Kite…

Ensure You check the forecast and the tide times. The forecast is fairly simple and you should be able to tell yourself by now if it’s any good for you to go kitesurfing, once again if in doubt about the particular kite you are using in any given wind speed, check the manufacturers guidelines.

The tide is a slightly more slippery beast and you’ll need to check with someone who knows what they’re talking about to determine the best phase of the tide to go in. In some places it doesn’t matter in other places it is of vital importance, check with another kitesurfer before you go.

Once at the beach (and ready to fly your kite) you can run through the following checks:

The first rule is one I was first taught as a dinghy sailor:

“If In Doubt, Don’t Go Out”

This is especially true as a beginner. If the waves just look a little bit meaner than you’d like or the wind is a little bit gustier than you’re used to…forget it, go to the pub instead. One of the great frustrations of learning to kitesurf is that as a beginner you do need almost perfect conditions to get out there and practice (so you can build up the confidence to go and take on more challenging conditions). Expect to spend a lot of time waiting around and many wasted trips to the beach in these initial stages. Fear not…it does get better as you do!

Risk Assesment…Sounds Dull Doesn’t It

Every time you arrive at the beach perform a risk assessment. The most important thing to determine is which way the wind is blowing.

Wind Direction In Relation To The Shore

Now we’re on the beach, wind is no longer defined as Southerly or Westerly, but can now be described (more usefully) in relation to the beach or shore. Thus when the wind is blowing off the sea onto the shore it is known as on shore, when the wind is blowing off the shore on to the sea it is known as off shore. When the wind is blowing along the line of the beach or shore line (in either direction) it is known as cross or side shore.

The Wind To Watch Out For…And It’s Not The One You Think

Statistically for a kitesurfer the most dangerous of these winds is an on shore wind. This wind brings waves and in general will feel stronger than in fact it is. This is the wind in which most broken bones, broken kites and broken pride happen as the waves and the wind are both doing their best to keep you on (and pile drive you into) the beach. Thus it is very easy to be catapulted back up the hard beach and do yourself, your kite or others damage. Even advanced riders can struggle to get out in a dead on shore wind. Our advise to start with would be to avoid these conditions and search for somewhere a little more forgiving.

Off shore winds will give a very flat looking ocean and will generally feel less strong than they actually are. The main reason that on shore winds are statistically the most accident prone winds is for the simple reason that no one goes out in an off shore wind. Off shore winds are lethal, make the slightest mistake or suffer a kit failure, which means you can’t get your kite back up in the air and you’ll quickly find yourself a long way out to sea before you know it, with a long swim back against the wind. Do not think that because you’re with someone else or there are other kitesurfers around that it’s alright for you to go out in an off shore. In reality it is very difficult for other kitesurfers to do anything to help you if you have a problem without endangering themselves. At best they can give the rescue services an idea of which way you were heading when you crossed the horizon!

“DO NOT DO IT!”

Cross shore winds can be great, the sea will be fairly flat and it’s fairly safe in that you’ll be returned in the general direction of the shore. If the bay curves round to meet the wind thus ensuring it is absolutely safe, this can be the best wind you can find, smooth and great for wave riding.

As a beginner I would suggest you look for cross onshore winds (that is somewhere in between on and cross so about 45 degrees to the beach) this will offer you ample opportunities to actually get out and practice, is perfectly safe and the waves shouldn’t be too big.

The simple rule to follow when assessing the wind is to draw a line between the source of the wind, yourself and the last bit of land you could cling onto if everything went wrong…then do not go past, or preferably anywhere near to crossing this line. Always assume the worst will happen and remember no matter how good or fit you are, a line can always snap or a kite break.

Next have a look for potential hazards both in the launch/landing area and the sea itself. You’re looking for rocks, pylons and anything else that doesn’t mix well with kites, lines and human bodies propelled at force!

Finally have a look at the sea, you’re best to have a chat with a local at this point as you need to know things like rips, and any other local effects that can impact upon your kitesurfing.

Once you’re happy with all this (yes, it is a lot but as you gain more experience you will assess all of this in a matter of minutes) you’re finally ready to get your little pinkies wet!


Posted on Leave a comment

Relaunching From The Water


The BIG Picture

Relaunching the kite from the water can be more of an art than a science at times, but there are some general rules that, if you follow them, will have you up and riding again in no time (most of the time!).

For the first part of this guide I will assume that you are attempting this on a fairly waveless day  or at least a day of smallish/less powerful waves. As the wave height increases there are an increasing amount of aspects you need to be aware of which we will look at in the second section, “Ever Decreasing Circles of Mastery.”

Water Relaunch

As soon as the kite crashes your first priority is to ensure there is tension in the lines (this may mean a quick bit of swimming/splashing about on your part). As long as there is tension you have control of the kite, if the lines are slack the kite will simply respond to whatever the wind and waves tell it to do, and often they will tell it to misbehave terribly, drifting in to the power zone and then inexplicably powering up, being flattened by waves and other actions that will leave you cursing.

Once you have tension in the lines, it is, (in theory) a simple case of steering the kite either left or right using the bar. Have patience, this may take a while. Slowly the kite will start to walk around to one edge of the wind window. Currents and waves will have an effect on this and you may find relaunching one way is considerably easier than the other.

All things being equal however, we recommend you always relaunch the kite on the beachward side of the window. This way you are being dragged back towards dry land. To start with or on a difficult day, relaunching your kite can take a while, if you’re relaunching on the seaward side you can find yourself miles out without realizing it before you get the damn thing back in the air.

Keep steering the kite in the same direction until it walks itself around to the edge of the wind window and slowly starts to rear up onto its side towards the normal launch position.

easy-relaunch

Something to beware of at this point is that the kite can start to set itself into this relaunch position well back of the edge of the window, i.e. when it is still close to the power zone, with the result that if it relaunches here you will be flung forward. This is especially likely to happen in strong winds or where the kite is being “assisted” with the launch by a strong current or waves. If you’re in deep water with loads of space this type of launch can be fun, if not, we suggest sheeting the bar out slightly while continuing to steer the kite.

At this point you are simply going to launch the kite as you would from the beach, with one major difference. Because the bottom panel of the kite is likely filled with water it has the tendency to suck the kite down back onto (and under) the surface. This means you will need to apply more steering than normal to release the kite. To do this you’ll normally need to have the bar pretty far in to really provide the leverage and power to get the kite to empty this water out. However if once the kite is free of this water you keep the bar in, the kite will simply stall backwards, dead fish like, into the water, or worse, loop round the power zone and force you to do an impromptu and very undignified impression of superman.

For this reason as soon as you see that the kite is about to release from the water, let the bar out fairly quickly (but still in a controlled manner) while maintaining the correct amount of steering to bring the kite upwards towards 12 o’clock. This will prevent the kite from back stalling and allow it to relaunch just as you would from the beach.


Breaking it Down – Decreasing Circles of Mastery

The Cheat Method

Release the bar (with both hands) push it away from you and reach down and grab the outer line closest to the edge of the window that you want to relaunch the kite (if you’re not sure which one this is, either of the outside lines will do to start with, if the kite starts steering the wrong way simply use the other one!). Aim to grab the line about 30 – 50 cms up the line (30 – 50 cms away from where it attaches to the bar).

Then holding the line between forefinger and thumb, GENTLY pull it (back) towards you and (up) over your shoulder (the same shoulder as the hand that you are using). This will give you extra leverage that will enable you to get the kite in to the launch position much faster.

The key here is be gentle, think of smooth Tai Chi movements not boxing jabs as you attempt to relaunch the kite this way.

As soon as the kite releases from the water, release the line. If you hold on to the line for too long the kite will spiral round and either back stall, or worse, loop round and crash back on to the water). Once you’ve released the line, grab the bar again with 2 hands and voila…you’re good to go!

While attempting to relaunch, the kite must be full of wind

Watch For The Wing Tips Collapsing

Watch for the wing tips collapsing or the trailing edge near to the wingtips folding down over the canopy. This is normally a sign that the kite is in the wrong position to launch (i.e. too far upwind), there’s not enough wind to relaunch or, more often, that you are pulling the line too hard…release the line slowly until the kite refills with air and then gently pull it back over your shoulder. By doing this you should ensure that the kite remains full of wind and starts to roll onto its side in to the launch position. If the wingtips fold in again, then release the line and start again…think of the line the same way you would a clutch in a manual car…squeeze on the line, don’t yank, this is not a fight, it’s a caress!

Use the Waves

In shore break you can use the white water to prop the edge up (be careful as if the wave is too big it will swallow the kite and suck it down). As the white water is approaching give the kite a little extra steer to allow the water to pass underneath it. The added resistance of the water against the leading edge can (if you’re lucky) force the kite further up into the relaunch position and make it easier to lift off the water.

In the same manner you can also use the current. If you attempt to relaunch in the opposite direction to that in which the current is running, the kite encounters more resistance. This again can force it into the relaunch position early and make relaunching it that much quicker…again beware of doing this if you’re massively overpowered as the kite will be launching that much closer to the power zone.

Bigger Waves

DSC_0262

In big waves speed is key…if you can give the kite a quick tug on one line and get it out immediately it will make your life a LOT easier. Once the waves swamp the kite, it becomes much more tricky to relaunch. However once it has been swamped it pays to take your time, sometimes just by letting it get hit by another wave it can reform and ready itself for relaunch.

A trick that can be useful if the kite has crashed directly downwind of you is to use one line to massively oversteer the kite, thus causing it to drop on to its back. Then pull (I would suggest with some enthusiasm) on the 2 centre lines to pull the kite out of the water directly downwind of you. I would recommend this for experts only as if it goes wrong it leaves you in a VERY vulnerable position for when that next wave comes rolling in.

If the waves are big and you are being dragged behind a kite caught in a wave, then be ready to release. This will protect you and your kite. In big waves you should ALWAYS be ready to release and be very happy with your safety release. Being towed underwater by a kite that has been caught in a wave is not fun, neither is watching said wave punch through the canopy of your kite because you are providing a counterweight to its force.


Interested in Learning More?

We offer a week Learn to Kitesurf Course in which we GUARANTEE you’ll learn to become an independent rider or you can come back for HALF PRICE until you are.

Check it out HERE.


Posted on Leave a comment

Flying The Trainer Kite


[youtube height=”315″ width=”560″]http://www.youtube.com/watch?v=3HuRNXUA5jo[/youtube]

Disclaimer

Power kiting is a dangerous sport. Please double check the wind speed and the manufacturers guidelines on the kite you bought before attempting to fly your kite.

Keeping The Damn Thing In The Air

Please ensure you have read and understood the chapter on launching and landing before even thinking about attempting this.

So you’ve got the little bugga in the air and are now wondering what on earth to do with it? To start with simply get used to the feeling of the kite, don’t try to do anything too specific with the kite simply focus on keeping it in the sky and enjoy the feeling of flying it.

Once you are happy with the very basic control of the kite we can move on to some more specific exercises.

Parking The Kite

Parking the kite simply means to keep your kite stationary in one spot. Why do we need to do this? When parking the kite, the kite will sit at the edge of the wind window (try parking the kite in the power zone to see what I mean…on a light wind day please!). This means the kite is going to be de-powered and should sit there quite happily. This allows you to focus on other things, picking up your board, chatting to your mates, checking out the hottie that just walked past. Alright the last one will often cause you to drop your kite as you crane your neck way too far round for comfort but I digress.

To park your kite, simply:

Fly the kite to any spot at the edge of the wind window. As the kite approaches the edge it slows, eventually coming to a stop on the edge. By doing this at about 45 degrees or between 10 and 11 o’clock you give yourself time to correct if things go wrong, (or if that hottie walks past!)

Once the kite has come to a stop, your goal is to keep it in one spot. If the kite starts to drift in one direction, gently correct for the motion by steering it in the other direction. Make sure that you don’t overcorrect.

Keep the kite in that spot until you know you have it under control and can keep it there for as long as you want.

Keep it Smooth

A hugely overlooked but very important skill. By steering the kite smoothly you control the power delivery and ensure that you are not being thrown around all over the place, Bucking Bronco style. By ensuring that as you steer you move the control system smoothly in and out controlling the power much like you would on a car by squeezing the accelerator you can ensure that you remain in control and aware of how much power is being delivered at any one time.

Think of the control system as an accelerator on a car, if you drop your foot and then release it quickly over and over again the car will literally bounce down the road. The kite will respond in exactly the same way if you apply power then let it off. It will power up and then de-power and you will pulled left and right without ever really knowing why. The key here is to relax (easy for me to say) once you have the kite in the air at 12 consciously relax your shoulders, upper arms, forearms and hands. Think of your self as a thunderbird puppet (but I’m Scott!) with your arms literally dangling from the controls.

If you can manage this something magical will happen, the controls will start to tell you where they want to be and you can simply tweak the controls by fractions of centimeters to control the kite. By relaxing your arms you will begin to feel the sweet spot. This is the point that the bar naturally wants to sit on, and is the point where you can just start to feel the bar resisting you. This signifies that there is a tiny amount of tension in the back lines which is the optimum point for controlling the kite. (this will not happen on 2 line kites as there is no bar in, bar out motion).

With time you will relax and start to steer smoothly naturally. However there are some things you can do to help.

Anticipate what the kite is doing and try to predict where it’s going and where you want it to be before it gets there. This will prevent you from making knee-jerk, quick and often over force full movements which will jerk the kite unnecessarily.

Practice flying your kite in a circle, over and over again as the kite circles the pressure on the controls will change and it will be great practice for you to get the feel for adjusting the controls to match what the kites doing.

Flying Figure eights will get you used to the power the kite generates and allow you to anticipate this power and so prepare for it…more on this now.

Figure 8’s

Steering your kite in a figure eight pattern both vertically and horizontally across the wind window.

Power Strokes

No, not something you do on your own at night but the most important trainer kite practice exercise on this page!

Power strokes are where the rubber hits the road – get good at them! You use them when you want to generate a lot of power with your kite, and are most often used when water-starting or getting up on your board. Depending on how much power you need, you can do a power stroke for low, medium, and high power.

Low Power Power-Stroke:

Start with you kite at 12 o’clock. 2. Dive the kite from 12 o’clock to 2:30. The kite will generate power as it passes through the wind window. If you were kiteboarding, and this was enough power, you would be able to water-start. If not, you would sink back into the water.The kite will fly to the edge of the wind window, you can reset and practice again – this time however use the…

Medium Power Power-Stroke:

Start with your kite at 11 o’clock. Dive your kite from 11, through the wind window, to 2:30. The kite will generate power as it passes through the window. Once your kite reaches the edge of the window, fly it up to 1 o’clock and dive it to 9:30. Still not enough? Ok its time for the big guns, try the…

High Power Power-Stroke:

Start with your kite at 10 o’clock. Fly the kite across the wind window to 2:30. The kite will be flying directly through the power zone, so it should be generating its maximum amount of power. Once the kite reaches 2:30, move it to 2 o’clock and drive it back through the power zone to 9:30. If thats not enough less breakfast, more wind or a bigger kite are needed!

Once you’ve done that and I would recommend repeating this lesson a couple of times until your really happy with it, your ready for the next lesson. So get out there and go fly a kite!

Advanced Kite Piloting Skills

Making The Damn Thing Dance

Now that you can fly your trainer kite, here are some exercises to practice to allow your skills and muscle memory to develop more fully. Remember the more time spent polishing these skills, the less time you will spend swimming and the more time you will spend riding.

Sliding During The Power Stroke

As you work on the power stroke, work to keep your centre of gravity behind your feet and not to get pulled forward into a running position. You should slide forward on the heels of your feet. If you think how this translates onto the board, if you are running every time the power comes on you will simply be going straight over the front of the board landing unceremoniously on your head, by dropping on your hips and driving through your legs you are transferring that power into the board and creating forward motion.

Practice Your Board Starts

This will develop your muscle memory for leg and hip positioning for getting up on your board. The goal of this practice is to make sure you point your board downwind when trying to get up and ride. Riding to your right side: Put your kite in neutral (hovering straight above your head), sit down on the ground, extend your right leg forward and bend your left leg in a little bit. Now send the trainer kite into a power stroke toward your right side. You should stand up (if you have enough power) on your right foot with your body turned at about a 45 degree angle to the wind.

Now move your trainer kite to the 1 o’clock position for your power stroke; notice how your hips and body naturally point your leg more down wind. One of the number one problems for new kiteboarders is not keeping their kiteboards pointed down wind when attempting a water start. Now work on your left side. If you decide to learn to snow or land board, make sure to use the same technique of pointing the board downwind.

Moving With The Trainer Kite

Run, ski, snowboard, buggy, land board or roller blade. Now that you are flying well, start running with the kite in the direction the kite is flying. You will notice different dynamics in the kite as you move. When you are kiteboarding, you are always moving with the kite and need to learn how to control the trainer kite during this movement and take advantage of the apparent wind you are generating. Use any of the vehicles listed above to help work on this. Remember to wear padding and a helmet.

Add A Harness And Chicken Loop

Depending on the kite you have you may have to do this from day 1 if not it is worth doing this now. To get the full benefits out of your trainer kite, get a harness and add a fixed loop to the bar, (you can buy one of these from your local windsurfing store or a bit of rope will do). Now you can begin to practice flying while being “hooked in” and work on kite control with one hand. This is a skill that is an absolute necessity for learning to kite in the water. You will need to fly one-handed while carrying your board to the water and trying to put it on your feet. Another great thing about adding a loop and harness is that you can snow or land kite for hours once you get hooked in.

Fly One-Handed

Hold the bar in one hand and fly with one hand, this is a skill that will build your confidence and get you used to hanging onto the middle of the bar. The idea of 1 handed flying is that now you don’t have as much leverage over the kite so it becomes harder to move the kite. This is actually a good thing as now wee can start to concentrate on other things such as picking up the board without the kite being able to fly all over the place.


Posted on Leave a comment

Setting Up, Launching & Landing The Trainer Kite


Where To Fly?

First pick out a good field or beach to fly at. The bigger and more open the better. Again if you’re not sure where you can and can’t fly kites please check with your local council or kite school who will be only too happy to let you know. Remember that if there are trees or buildings between you and the wind, the trainer kite will not fly properly (see the chapter on the effect of obstacles on wind speed).

Beware of practicing close to obstacles (trees, roads, lamp-posts etc) as they can all get tangled up with the kite, also avoid practicing close to high buildings as these can create up-drafts and eddies which will adversely effect the performance of the trainer kite. If you think of a river running over rocks, those white bits of swirling water just after the rocks are showing exactly the same effect that obstacles have on the wind, causing it to eddy, swirl and generally do nasty things.

The bigger the open space you can find the better. Avoid areas with power lines at all costs. If in doubt consult the section on obstacle effects on wind speed for a recap on things to avoid.

In general, you want to launch your kite where you have enough power to get it off the ground, but not so much power that you get overwhelmed when it launches. This spot will change depending on how much wind you have.

UPwind and DOWNwind

An object upwind of you will be closer to the source of the wind while an object downwind will be further from it. I find this easiest to describe in terms of smell. I am teaching Nick to learn to kitesurf. As is sometimes my way I have not had a bath in about 3 weeks and the wind is blowing on shore (off the sea on to the shore). Now, if I stand nearer to the sea than Nick, along the direct line of the wind, then he will get the full smack of my unwashed glory straight up the nostrils. If however Nick is closer to the sea (and thus the source of the wind) then me he will be blissfully unaware of my hygiene habits and still (most likely) think I’m an alright kind o’ guy!

Upwind or Downwind

Setting Up the Trainer Kite

Setting Up To Hot Launch (Light wind only)

Take your kite out of its bag and lay it on the ground with the bridle lines facing up and the trailing edge facing into the wind. Place sand or any other non sharp and fairly weighty object on the trailing edge so the kite doesn’t blow away, or get your mate to hold it in place (brief them that letting go and watching you flying down wind attached to the kite is not big or clever). Starting at the kite unwind the lines from the bar, walking INTO the wind.

Setting Up To Launch From The Edge Of The Wind Window (recommended)

Lay out the kite parallel to the wind and fold the kite in half (folding towards the bar). Weigh the kite down, with sand or other blunt object about half way down the kite, near to the leading edge. Then walk the bar and lines out at an angle of 90 degrees or across the wind.

Setting Up The Trainer Kite For Launch

Whichever method you choose once you’ve fully unwound the lines just check that they are not tangled, you may need to un-attach the lines at the kite end and un-ravel them if they have become tangled to make sure there are no knots or twists prior to launch. If you do need to reattach the lines use a larks head knot.

Packing Away Your Trainer Kite

Packing away your kite is exactly the same as setting it up but in reverse. Land your kite and secure it with something heavy and blunt (like your mate!). Then start wrapping the lines around the handle in a figure 8 motion walking towards the kite as you do it.

The more care you take here the easier it will be to unwind the next time you come to fly your kite. If you make sure the lines are wrapped up tight it will make sure they don’t fall off the handle whilst in storage and save you a huge headache untangling them next time round.

Something to bear in mind is that for the first few weeks of kite flying, the lines are the thing that are likely to give you the biggest problems as they seem to get tangled around EVERYTHING, have patience with them. Take your time and put them away properly and you’ll save yourself some real birds nests in your lines the next time you go kiting.

Once you reach the kite fold the kite in half, ensuring all the bridle lines are inside the kite and then place the lines and handles/bar on top of the wing tips. Then simply roll the kite around the bar until it’s all away and then fold it down so it fits back in the bag.

Kite Gear Care And Pre Flight Checks

The main things to check on your equipment are that:

  • You have no knots in any of your lines
  • You have no tangles or unwanted knots in the bridle
  • Your kite and kite materials are in good condition, any small tears or holes need to be patched before flying the kite
  • If you have any knots in your lines or bridle I would recommend you to get them out before you start flying your kite. A knot in the line will reduce the strength of the line at that point by 50%, leading to to greatly increased chance of the line snapping while you are flying.

A great little trick for getting knots out of lines is to take and old piece of cloth and wrap it around the section of line with the knot. Then place the cloth containing the line and knot onto a hard surface (an old book works great) take a hammer and start hitting the knot through the cloth. Do this for about 20 seconds then take another 20 seconds to try to pry the knot loose. Repeat this until the knot works itself loose. Note for the first few minutes it will probably look as if nothing is happening, the key here is patience, this does work just give it a bit of time!

Your kite should be in one piece (fairly obviously!) if there are any small rips or tears in the canopy do not fly the kite but either apply a patch (a bit of duct tape will do in the short term) to both sides of the tear or for larger tears take the kite to get repaired. A small tear or hole will very quickly become a big tear if not patched or repaired straight away. Also check that the bridle is firmly attached to the kite at all points. If you see the bridle pulling away from the kite at any point again stop and take the kite to be repaired before flying.

Care Of Your Kite Gear

The main things to be careful of here are:

  1. Putting your kite gear away dry and clean
  2. Avoid areas with sharp rocks or plants when flying your kite
  3. Putting your kite gear away dry and clean is essential to preserving its life span. If you can’t pack it away like this at the time (because its raining or the weather doesn’t allow) then get out all your kite gear and dry it off at the next possible opportunity. For those of you who are practicing on the beach, sand is the single biggest kite killer of all time. Make sure you get all the sand off your kite gear before packing it away. Or if not possible again do so at the next possible opportunity. Sand will rub against the stitching and the canopy of the kite wearing both out in a very short time. It will also get into the lines and weaken them from within. Flying wet kites (wet foil kites that is, LEI’s are designed to deal with the water) is not advisable as it adds to the weight of the kite and puts a lot more strain on the structure of the kite and bridle and can lead to damage to the kite.

Avoiding areas with sharp rocks is fairly obvious but also be aware of plants with sharp branches or thorns. These are often quite difficult to spot but will trash your kite just as quickly.

Launching The Trainer Kite

[youtube height=”315″ width=”560″]http://www.youtube.com/watch?v=Jue0MrwhkMo[/youtube]

Getting The Damn Thing Off The Ground

Disclaimer

Power kiting is a dangerous sport. Please double check the wind speed and the manufacturers guidelines on the kite you bought before attempting to fly your kite.

Sheet IN Sheet OUT – Only Applicable To 4 Line Kites

On a bar set up, sheeting in is simply pulling the bar towards you, sheeting out…you guessed it, means pushing the bar away from you. In general terms, pulling the bar in powers the kite up and pushing the bar away de powers the kite.

On a handle this translates to either pulling back with the upper section of the handle to power up (sheet in) or push the handle forward so the bottom of the handle touches your wrists to de power (sheet out).

The Safety Leash

Now that you will be getting your kite in the air, it’s time to learn one of the most important things a beginner must know – how to use your safety system. Assuming that your kite has a safety leash (it should) and that you are wearing it (you absolutely should be) all you need to do is this:

“LET GO OF THE HANDLE/BAR!”

So why is this a difficult thing to do? It’s the opposite of your natural reaction. Let’s think about it. You use the safety system when things get out of control; when you get overpowered and don’t have time to react. You’re getting jerked and pulled by the kite and you have more power than you can handle.

What do most people do?</>

They instinctively fight back. They flex their muscles, clench the controls, and fight with the kite (whilst thinking ‘oh sh*!’). They instinctively clench the controls…when what they need to do is let go! You cannot wrestle with the full power of these kites and win! You don’t even want to try – it’s a bad habit to get into. Bottom line: If you get overpowered, don’t fight the kite. Get into the habit of letting go of the controls and if necessary activating the safety system.

The safety leash is always the first thing you attach and the last thing you take off whilst flying your kite and for good reason as it gives you that extra level of security, knowing that all you have to do is let go and all will be cool.

Launching The Trainer Kite

Launching From The Edge Of The Wind Window (recommended)

On a 4 line bar, having set up the kite at the edge of the wind window, attach the safety leash, hook in to your harness, take the bar and walk yourself about 15-30 degrees upwind of the kite and slowly tension the lines by pulling the bar IN and stepping backwards until you feel the kite very gently start to pull against your grip.

If you have a 2 line kite, simply take the bar, walk yourself 15-30 degrees upwind of the kite and tension the lines.

Slowly move back downwind if the kite starts to collapse. At some point (you might need a bit of patience) the kite will start to stand upright on its wingtip. Now slowly start to steer it upwards along the edge of the wind window towards the zenith.

Hot Launch (Light Winds Only)

Having set up the kite directly downwind of the bar, take the bar and hook in. Grab the centre lines with one hand (do not grab onto the flag line). Keep the other hand near to the safety release in case things go wrong. To launch the kite pull the centre lines towards you, you may to pump them slightly in light winds. The kite may flap around a little if it hasn’t been pre-inflated on the beach, while it inflates it will be a little more difficult to control. This is normal, simply pilot the kite to the zenith until it fully inflates as becomes easily controllable.

On a 2 line kite simply give the bar a good tug to initiate the launch.

Landing Your Kite

Anyone can crash a kite and I guarantee you will do it many times before you finally evolve onto a kitesurfing kite (every time you do, think of the beating you’re saving the nice, new shiny kitesurfing kite your soon going to own!) Try to avoid needless crashing of the kite as it will eventually damage the kite and it makes you look…well…like a monkey! To land your kite all you need to do is this:

  • Fly the kite to the edge of the wind window. It doesn’t matter where; just get it to the edge.
  • With slow, smooth movements, bring the kite towards the ground either at the 3 or 9 o’clock positions.
  • Bring your kite down and land it gently to you glamorous assistant at the edge of the wind window.
  • Move to your kite and secure it.
  • Pack it up and away you go!
  • Landing your kite is quite simple, but is made easier by remembering a few key points:

Try to keep your arms extended and in front of you, do not twist the bar around the side of you, move your body to follow the kite in the sky so that your arms are always in front of you.

Keep the bar more or less horizontal or try mirroring the angle of the leading edge of the kite with that of the bar, do not be tempted to use the bar like a steering wheel instead use it like the handlebars of a bike.To steer the kite effectively, think of your arms as pistons when one goes out the other comes in. To start with be gentle, make tiny movements with the bar as you get more confident make the movements bigger.

Things To Remember:

  • You will crash your trainer kite!  Try not to crash it directly down wind as it is possible to blow seams out of a kite if crashed directly into the ground at 50 miles per hour. Yes, they can move that fast.
  • Wind is like a road; sometimes it’s bumpy and sometimes it’s smooth. Your kite may behave well one day and fly terribly the next. Most likely the wind is very different, do not let this get you down and disheartened you, learning to fly a kite in ALL conditions is part of the training.
  • Be careful in high winds. Even small trainer kites develop a lot of power. in general a 3m trainer kite will allow a 200lb person to jump 6-10 feet forward when the winds are over 18mph. Always leave yourself room for evasive action (3-5 line lengths).
  • If you have someone helping you launch the trainer kite, make sure they move immediately after launching. Also, be nice and share your kite with them.
  • It takes most people anywhere from 30 mins to 3 hours to learn to fly a trainer kite proficiently. Don’t expect to be a great flier in 5 minutes.
  • Twists in the lines – All kites will still fly exactly the same even with a twist in their lines. To untwist the lines, either fly a complete loop in the other direction, or spin your body quickly around. Most kites can fly with 2 or 3 loops before the lines begin to bind up.